

Have you ever found yourself in the midst of an intense movie night with your Epson projector, only to be halted in your tracks by a sudden black screen? If so, you may be a victim of the dreaded Epson projector lamp timer. But fear not! This step-by-step guide will take you through the mystical art of resetting your Epson projector lamp timer and reclaiming those precious movie nights. Say goodbye to the darkness and hello to a world filled with vibrant colors and crystal-clear images. So, grab a tub of popcorn, settle into your favorite spot on the couch, and let’s dive into the enchanting world of Epson projector lamp timers.
What is a Lamp Timer in a projector?
A lamp timer is a feature found in projectors that allows users to track and monitor the usage of their projector lamp. Projector lamps are an essential component in projectors, providing the necessary light source for projecting images and videos onto screens or surfaces.
Furthermore, using an expired projector lamp can also cause damage to the projector itself. The heat generated by an old lamp can potentially harm other internal components of the projector, resulting in costly repairs or replacements.
Apart from tracking usage and indicating when it’s time for a replacement, some projectors also allow users to reset the lamp timer after replacing the lamp. This helps in accurately tracking the usage of new lamps and ensuring they are replaced at the appropriate time.
Moreover, keeping track of the lamp timer can help users plan and budget for future maintenance costs. Projector lamps can be quite expensive, so knowing when a replacement will be needed allows users to save up and purchase a new lamp before the current one reaches its end.

Why Should You Reset Your Lamp Timer?
There are several reasons why you might need to reset the lamp timer on your projector or TV. Here are a few important ones:
- Accurate Bulb Life Monitoring: The most common reason for resetting the lamp timer is to ensure accurate monitoring of bulb life. Lamp hours are used to estimate when it’s time to replace the bulb, and if you don’t reset the timer, it may continue to count even after you have replaced the bulb. This can lead to premature replacement of the bulb and unnecessary expenses.
- Optimal Performance: Another reason for resetting the lamp timer is to ensure optimal performance. As bulbs age, their brightness decreases and color accuracy may also be affected. By resetting the timer, you can get a more accurate measurement of how long the bulb has been in use and when it’s time to replace it for optimal performance.
- Maintenance Reminders: Some projectors or TVs have built-in maintenance reminders that are based on lamp hours. By resetting the timer, you can ensure that these reminders are accurate and timely. This is especially important for routine maintenance tasks such as cleaning the filters or replacing other components.
- Warranty Purposes: Many projectors and TVs come with a warranty that covers the bulb for a certain number of hours. By resetting the timer, you can keep track of how many hours have been used and ensure that the bulb is still under warranty if it needs to be replaced.
- Energy Efficiency: Resetting the lamp timer can also help with energy efficiency. If you’re not keeping track of how long the bulb has been in use, you may end up leaving it on for longer than necessary. By resetting the timer and monitoring the lamp hours, you can make sure that you’re only using the bulb when needed and reducing energy waste.
It’s important to note that different projectors or TVs may have different methods for resetting the lamp timer. Make sure to consult the manual or manufacturer’s website for specific instructions. Overall, resetting the lamp timer can help you save money, improve performance, and ensure proper maintenance of your projector or TV. So, it is recommended to reset the lamp timer periodically to get the most out of your device. Keep track of your lamp hours and make sure to replace the bulb when needed for the best viewing experience [1].
How to Reset Epson Projector Lamp Timer: Step-by-Step Procedure
Step 1: Gather Necessary Materials
Before you begin the process of resetting your Epson projector lamp timer, it’s important to ensure that you have all the necessary materials ready. This includes a brand-new lamp specifically designed for your projector model, a screwdriver for easy access to the lamp compartment, and a soft cloth or towel to handle the lamp with care and prevent any smudges or fingerprints. By having these essential tools at hand, you can confidently proceed with the reset process and ensure optimal performance and longevity for your projector’s lamp.

Step 2: Turn Off the Projector
To ensure the safety of your projector and prevent any potential accidents or damage, it is crucial to completely turn it off before initiating the lamp timer reset process. This involves not only unplugging the power cord but also patiently waiting for the projector to cool down, allowing sufficient time for the internal components to reach a safe temperature before proceeding with the reset. Taking these precautionary measures will help maintain the longevity and optimal performance of your projector.
Step 3: Locate the Lamp Compartment
To proceed, the next step is to carefully locate the lamp compartment on your Epson projector. Take a closer look at the back or side of the device, as the exact position may vary depending on the specific model you own. In case you encounter any challenges in finding the compartment, don’t hesitate to refer to the detailed instructions provided in your projector’s manual. Once you have successfully identified the compartment, employ a screwdriver to effectively remove any screws or latches that might be securely holding it in place.
Step 4: Remove the Old Lamp
With the lamp compartment now easily accessible, you can proceed to carefully remove the old lamp by gently pulling it out. Take extra caution while handling it, ensuring that you avoid any contact with the delicate glass surface to prevent any potential damage. Make sure to grip the base of the lamp firmly but not too tightly, as excessive force may cause it to break. Once removed, place the old lamp aside in a safe and secure location, such as a soft cloth or cushioned surface, ensuring it is out of harm’s way and protected from any accidental bumps or falls. It’s important to handle the old lamp with care, as it contains delicate components that should not be mishandled. By following these steps, you can ensure a smooth and safe replacement process for your lamp.
Step 5: Install the New Lamp
Take your new lamp, carefully holding it by the base, and gently insert it into the projector. Make sure to align the connectors on the lamp with those inside the compartment, ensuring a proper fit. Slowly and firmly push the lamp in until it is securely connected. To guarantee a stable connection, you may need to apply a bit of pressure. Once the lamp is inserted, locate any screws or latches that were previously removed and use them to secure the lamp in its place. Double-check the manual if you encounter any difficulties during this step, as it provides helpful guidance for troubleshooting.

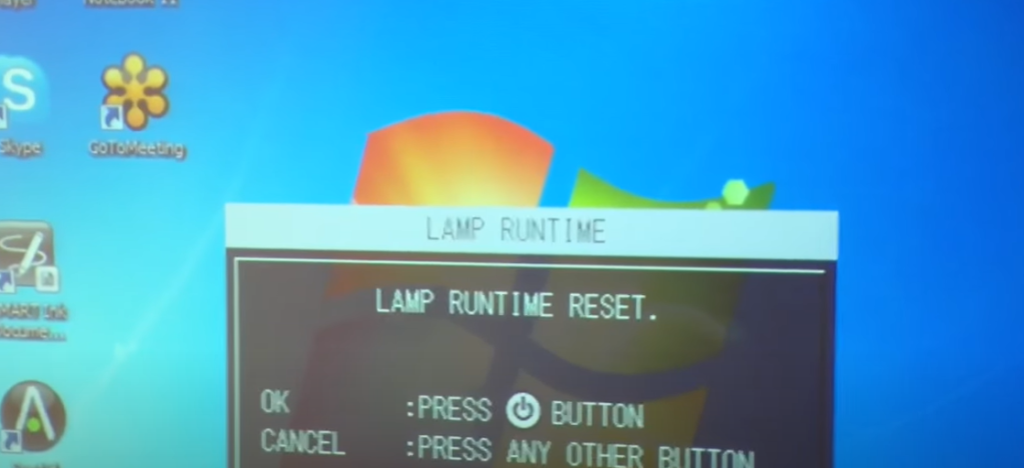
Step 6: Reset the Lamp Timer
Now comes the most crucial step – resetting the lamp timer on your Epson projector. This is a straightforward process and involves pressing a few buttons on your projector’s remote control in a specific sequence. Start by pressing the “Menu” button, followed by the “Enter” or “OK” button on your remote control. This should bring up the projector’s menu options. Navigate through the menu until you find the “Reset Lamp Timer” option and select it using the “Enter” or “OK” button. Finally, press and hold down the “Enter” or “OK” button for a few seconds until you see the lamp timer reset confirmation message on your projector’s screen.
Step 7: Turn the Projector On
Once you have successfully completed the lamp timer reset process, proceed to turn on your Epson projector and enjoy its optimal performance with the newly installed lamp. You can now confidently use your projector without worrying about any interruptions caused by a lamp timer warning or potential damage to the device. By following these simple steps, you can effectively maintain and extend the lifespan of your Epson projector’s lamp, ensuring quality performance for all your projection needs. Remember to also keep track of how long you have used the new lamp so that you can reset the timer again when necessary [2].
How to maintain an Epson Projector Lamp Timer?
Epson projectors are a popular choice for both personal and professional use due to their high-quality display and durability. However, like any other electronic device, regular maintenance is crucial in prolonging its lifespan. One of the essential components of an Epson projector is its lamp timer.
The lamp timer keeps track of the number of hours the projector lamp has been in use. Once the lamp timer reaches a certain number of hours, it will trigger a warning message on the projector screen, indicating that it is time to replace the lamp. In this guide, we will discuss how to maintain an Epson projector lamp timer to ensure optimal performance.
Why is maintaining the lamp timer important?
The lamp timer is essential for keeping track of the lifespan of your projector lamp. It not only notifies you when it’s time to replace the lamp, but it also helps prevent sudden lamp failures during important presentations or events. By maintaining the lamp timer, you can plan and replace the lamp before it reaches its end of life, avoiding any potential disruptions.
How to maintain the Epson projector lamp timer?
- Keep track of lamp usage:
The first step in maintaining the lamp timer is to keep track of how many hours the projector has been in use. Most Epson projectors have a built-in feature that displays the number of hours it has been used since the last reset. Make it a habit to check this information regularly, especially if you use the projector frequently.
- Avoid sudden power interruptions:
Sudden power outages or interruptions can damage the projector lamp and disrupt the lamp timer. To avoid this, use a surge protector when plugging in your projector. This will help protect the device from any sudden voltage spikes or drops.
- Clean or replace air filters:
Air filters are crucial in maintaining proper airflow and cooling for the projector lamp. Over time, these filters can become clogged with dust and debris, reducing airflow and causing the lamp to overheat. Make sure to clean or replace the air filters regularly as recommended by the manufacturer.
- Use low power mode:
Most Epson projectors come with an eco-friendly low-power mode that extends the lifespan of the projector lamp. This mode reduces the brightness of the lamp, thereby reducing its power consumption and heat output. By using this mode, you can significantly prolong the life of your lamp and maintain the accuracy of the lamp timer.
FAQ
How can I increase the life of a projector lamp?
Projector lamps are an essential component of any projector, and their lifespan can greatly affect the overall performance and cost-effectiveness of the device. Here are some tips to help you increase the life of your projector lamp:
- Keep the projector in a well-ventilated area: Heat is one of the main enemies of a projector lamp, so make sure it has enough space to dissipate heat properly. Avoid placing the projector in a confined space or near other heat sources.
- Use the correct brightness and power settings: Adjusting the brightness and power settings can significantly impact the lifespan of your lamp. Higher levels may produce a better image, but they also put more strain on the lamp, leading to a shorter lifespan.
- Allow proper cooling time: After using the projector, make sure to allow it to cool down before turning it off or moving it. Turning off the projector without proper cooling time can cause thermal shock and damage to the lamp.
- Avoid frequently turning the projector on and off: Frequent on/off cycles can put unnecessary strain on the lamp. If possible, try to keep the projector running for longer periods rather than turning it on and off frequently.
- Keep the projector clean: Dust and debris can accumulate on the lamp, causing overheating and reducing its lifespan. Regularly clean the projector’s filters and outer casing to prevent this from happening.

What is the optimal distance for a projector?
The optimal distance for a projector depends on several factors, including the type of projector, the size of the screen, and the aspect ratio of the content being displayed. As a general rule, you should aim for a distance that allows the image to fill the screen without any distortion or loss of clarity.
To determine the optimal distance for your specific setup, refer to the projector’s user manual or consult with a professional installer. Some projectors also have built-in features or tools that can help you adjust the distance and focus for optimal image quality.
When should I replace the lamp in a projector?
The lifespan of a projector lamp can vary depending on the usage and environmental conditions. However, as a general guideline, it is recommended to replace the lamp after 2000-3000 hours of use or when the image quality starts to deteriorate.
You can also keep an eye on the projector’s warning light, which indicates when the lamp needs to be replaced. It’s essential to replace the lamp with a genuine and compatible replacement to ensure optimal performance and avoid any potential damage to the projector. Finally, always follow the manufacturer’s recommendations for replacing the lamp to prevent any issues or safety hazards.
What will happen if I don’t change the bulb in a projector?
If you do not change the bulb in your projector when it needs to be replaced, several things can happen:
- Reduced image quality: As a projector lamp nears the end of its lifespan, the image quality will start to deteriorate. It may become dimmer, colors may appear faded or distorted, and there may be overall reduced clarity.
- Potential damage to the projector: An old or damaged lamp can cause issues with the projector’s internal components, leading to potential malfunctions and costly repairs.
- Safety hazards: In some cases, an old lamp may overheat or explode, causing a safety hazard. It is essential to replace the lamp when needed to avoid any potential accidents.
Useful Video: How To Reset Lamp Runtime on a Projector
Conclusion
So, if you need to reset the Epson projector lamp timer, you should follow the instructions above. Resetting the lamp timer is important to ensure that your Epson projector continues to function properly. It also helps in maintaining the quality of your projected images and extends the lifespan of your projector. Additionally, it is recommended to keep track of how many hours you have used your projector since its last lamp replacement. This will give you an idea of when you should replace the lamp and avoid unexpected projector downtime.
References:
- https://pointerclicker.com/how-to-reset-epson-projector-lamp-timer/
- https://smallbusiness.chron.com/reset-projector-lamp-timer-53848.html